Post by Sesu Reinoruzu on Apr 28, 2009 4:06:53 GMT -5
Well animation may seem like a hard task to learn but its quite easy.
While Flash8 is usually used for animating videos this guide will be on simple gif making from your pics.
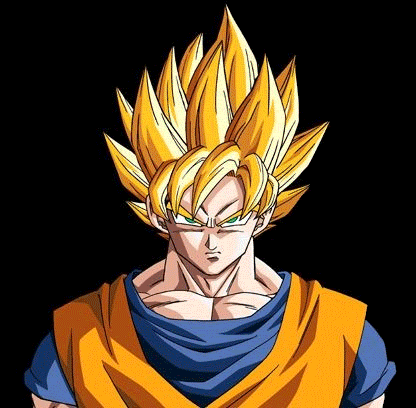
Here I will change Goku's hair colour from this pic here.

If you dont want to learn how to edit a pics colours skip to red line.
Open the image in Photoshop and simply trace all his hair features with the polygon lasso tool.
*If like in this pic he has eyebrows and other bits just make them a layer each and then merge them with rest of hair*
Make as many copies of it as you want to colour it with, I made 8
*If you eventually want more you will need to keep the original colour as a duplicate to duplicate from or it may turn out weird*
Now just highlight the layer of a blank hair texture and select it with the marquee tool, then just use Crtl+U and change saturation, hue, lightness etc.
When all layers are done you should save the img as a PSD for later incase you want to re-edit it or if the animation stuffs up.
___________________________________
Set up all your layers in the order you want then to show up in image.
Now go Window => Animation
A box at the bottom of your screen should appear with all our layers.
Leave the first layer blank but highlight the second layer in the animation window.
Go to the frame 0 and a left-right slider arrow should appear, just drag the layer to the desired frame length (can be edited later if too fast/slow).
Now do this to other layers in an upside down stair pattern, this means every time the red line hits the end of the animation slider it will become visible, IE flick to a new colour.
now when all done grab the blue thing at the start of the grey section (ends current animation loop) and put it at an even interval of the rest of layers.
Now press the play button and it should flick between colours.
Now to export as a GIF.
Go File => Save for Web & Devices.
Put the file your saving to as GIF and Looping Options to forever. Dont fiddle with other settings as they are not really important.
Now just click save and your done.
Open up the file and test it.
Heres the one I made earlier.
While Flash8 is usually used for animating videos this guide will be on simple gif making from your pics.
Here I will change Goku's hair colour from this pic here.
If you dont want to learn how to edit a pics colours skip to red line.
Open the image in Photoshop and simply trace all his hair features with the polygon lasso tool.
*If like in this pic he has eyebrows and other bits just make them a layer each and then merge them with rest of hair*
Make as many copies of it as you want to colour it with, I made 8
*If you eventually want more you will need to keep the original colour as a duplicate to duplicate from or it may turn out weird*
Now just highlight the layer of a blank hair texture and select it with the marquee tool, then just use Crtl+U and change saturation, hue, lightness etc.
When all layers are done you should save the img as a PSD for later incase you want to re-edit it or if the animation stuffs up.
___________________________________
Set up all your layers in the order you want then to show up in image.
Now go Window => Animation
A box at the bottom of your screen should appear with all our layers.
Leave the first layer blank but highlight the second layer in the animation window.
Go to the frame 0 and a left-right slider arrow should appear, just drag the layer to the desired frame length (can be edited later if too fast/slow).
Now do this to other layers in an upside down stair pattern, this means every time the red line hits the end of the animation slider it will become visible, IE flick to a new colour.
now when all done grab the blue thing at the start of the grey section (ends current animation loop) and put it at an even interval of the rest of layers.
Now press the play button and it should flick between colours.
Now to export as a GIF.
Go File => Save for Web & Devices.
Put the file your saving to as GIF and Looping Options to forever. Dont fiddle with other settings as they are not really important.
Now just click save and your done.
Open up the file and test it.
Heres the one I made earlier.